
| 일 | 월 | 화 | 수 | 목 | 금 | 토 |
|---|---|---|---|---|---|---|
| 1 | 2 | 3 | 4 | |||
| 5 | 6 | 7 | 8 | 9 | 10 | 11 |
| 12 | 13 | 14 | 15 | 16 | 17 | 18 |
| 19 | 20 | 21 | 22 | 23 | 24 | 25 |
| 26 | 27 | 28 | 29 | 30 |
- CUDA
- timm
- openAI
- ros
- 분당맛집
- linux
- 스팸
- ubuntu
- socketio
- no space left on device
- 티스토리챌린지
- tensorflow
- 맛집
- 판교
- ROS2
- string
- 딥러닝
- Android
- Torch
- 터미널
- TTS
- python
- GPT
- humble
- CLASS
- pytorch
- error
- ChatGPT
- 오블완
- opencv
- Today
- Total
RoBoLoG
[TensorFlow] Neural Style Transfer - Pretrained Model 사용하기 본문
Neural Style Transfer를 사용하여 개성 넘치는 프사 만들기!
요즘은 AI가 그림도 그린다고 하길래 후다닥 구글링을 시작하였습니다.
그러다가 발견한 Neural Style Transfer!! 딥러닝을 사용하여 이미지를 원하는 스타일로 바꾸어 주는 기술이라고 합니다.
마침 LinkedIn 프로필 사진으로 뭐할까 막막하던 차였는데 이걸로 프로필 사진이나 만들어야겠습니다.
구현환경
구현 환경은 아래와 같습니다.
[OS]
Windows10

[Python Packages]
matplotlib                   3.6.0
numpy                        1.23.3
opencv-python                4.6.0.66
tensorflow-gpu               2.8.2
tensorflow-hub               0.12.0
Import Packages & Function Declaration
Tensorflow Tutorial의 Colab을 기반으로 구현하였습니다. 아래 링크를 참고해주세요.
참고: https://www.tensorflow.org/tutorials/generative/style_transfer?hl=ko
tf.keras를 사용한 Neural Style Transfer | TensorFlow Core
12월 7일 Women in ML 심포지엄 참석 지금 등록 tf.keras를 사용한 Neural Style Transfer 컬렉션을 사용해 정리하기 내 환경설정을 기준으로 콘텐츠를 저장하고 분류하세요. Note: 이 문서는 텐서플로 커뮤니
www.tensorflow.org
먼저 python 패키지들을 import하고 필요한 함수를 선언합니다. 각 함수에 대한 설명은 주석을 달아놓았어요!
import functools
import os
import cv2

from matplotlib import gridspec
import matplotlib.pylab as plt
import numpy as np
import tensorflow as tf
import tensorflow_hub as hub

def crop_center(image):
  """원본 이미지에서 정사각형의 이미지를 Crop해서 Return합니다."""
  shape = image.shape
  new_shape = min(shape[1], shape[2])
  offset_y = max(shape[1] - shape[2], 0) // 2
  offset_x = max(shape[2] - shape[1], 0) // 2
  image = tf.image.crop_to_bounding_box(
      image, offset_y, offset_x, new_shape, new_shape)
  return image

@functools.lru_cache(maxsize=None)
def load_image(image_url, image_size=(256, 256), preserve_aspect_ratio=True):
  """이미지를 load합니다. url이나 image_path를 입력해주시면 됩니다."""
  # Cache image file locally.
  try:
    image_path = tf.keras.utils.get_file(os.path.basename(image_url)[-128:], image_url)
    # Load and convert to float32 numpy array, add batch dimension, and normalize to range [0, 1].
    img = tf.io.decode_image(
        tf.io.read_file(image_path),
        channels=3, dtype=tf.float32)[tf.newaxis, ...]
  except:
    img = np.array([cv2.cvtColor(cv2.imread(image_url),cv2.COLOR_BGR2RGB)/255],dtype=np.float32)

  img = crop_center(img)
  img = tf.image.resize(img, image_size, preserve_aspect_ratio=True)
  return img

def show_n(images, titles=('',)):
  """이미지를 보여주는 함수입니다."""
  n = len(images)
  image_sizes = [image.shape[1] for image in images]
  w = (image_sizes[0] * 6) // 320
  plt.figure(figsize=(w * n, w))
  gs = gridspec.GridSpec(1, n, width_ratios=image_sizes)
  for i in range(n):
    plt.subplot(gs[i])
    plt.imshow(images[i][0], aspect='equal')
    plt.axis('off')
    plt.title(titles[i] if len(titles) > i else '')
  plt.show()
Model Import
다음으로 모델을 불러오면 됩니다. hub_handle에 model url을 넣어도 되지만 저는 로컬로 돌리는 것을 좋아하니까 Tensorflow hub에서 직접 다운받았습니다. (링크:https://tfhub.dev/google/magenta/arbitrary-image-stylization-v1-256/2)
TensorFlow Hub
tfhub.dev
hub_handle = 'models/magenta_arbitrary-image-stylization-v1-256_2'
hub_module = hub.load(hub_handle)
Model Inference and Output Save
드디어 대망의 Neural Style Transfer 실행!
# images 폴더 안에 스타일을 바꿀 이미지를 넣습니다.
image_list = ["my_profile.jpg", "https://upload.wikimedia.org/wikipedia/commons/thumb/f/fd/Golden_Gate_Bridge_from_Battery_Spencer.jpg/640px-Golden_Gate_Bridge_from_Battery_Spencer.jpg"]
# images 폴더 안에 스타일 이미지를 넣습니다.
style_list = ["amadeo_cardoso.jpg","clock.jpg","hubble_pillars_of_creation.jfif",
"kanagawa_great_wave.jpg","kandinsky_composition_7.jfif","korean_style.jpg","modernism_1.jfif",
"monariza.jfif","munch_scream.jpg","napoleon.jpg","picasso_bottle_of_rum.jpeg",
"picasso_crying_woman.jfif","picasso_demoiselles_avignon.jfif","picasso_violin.jpg","turner_nantes.jpg",
"van_gogh_starry_night.jpg", "https://upload.wikimedia.org/wikipedia/commons/0/0a/The_Great_Wave_off_Kanagawa.jpg"]
# input_image 사이즈는 굳이 안 바꿔도 될 것 같습니다.
input_image_size = 384
for final_image_size in [256,512,1024]: #final image 사이즈를 결정합니다. 해당 값에 따라 결과가 확연히 달라집니다.
for image_path in image_list: # image_list에서 선언한 이미지들을 대상으로 합니다.
for style_path in style_list: # style_list에서 선언한 스타일들을 대상으로 합니다.
content_img_size = (input_image_size, input_image_size)
style_img_size = (final_image_size, final_image_size) # Recommended to keep it at 256.
# 이미지를 Load 합니다.
content_image = load_image("images/"+image_path, style_img_size)
style_image = load_image("images/"+style_path, content_img_size)
style_image = tf.nn.avg_pool(style_image, ksize=[3,3], strides=[1,1], padding='SAME')
# 딥러닝 Inference
outputs = hub_module(tf.constant(content_image), tf.constant(style_image))
stylized_image = outputs[0]
# 원본,스타일,변환 이미지를 Matplotlib을 이용하여 보여줍니다.
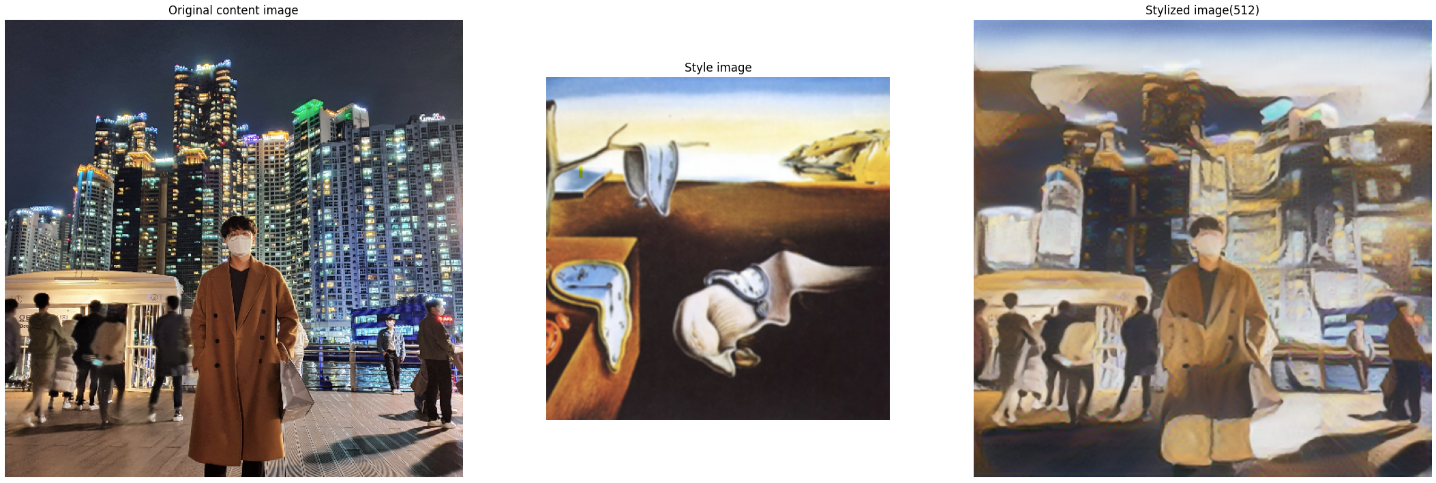
show_n([content_image, style_image, stylized_image], titles=['Original content image', 'Style image', 'Stylized image('+str(final_image_size)+')'])
# 최종 이미지를 outputs 폴더 안에 저장합니다.
# outputs 폴더를 만들어주셔야 해요!
save_image = stylized_image[0].numpy()*255
save_image = cv2.cvtColor(save_image,cv2.COLOR_BGR2RGB)
cv2.imwrite("outputs/"+str(final_image_size)+"_"+style_path.split(".")[0]+"_"+image_path,save_image)Outputs
해당 코드를 실행하면 아래와 같은 Output을 보실 수 있습니다!

저의 프로플 사진에 뭉크의 절규를 섞으니... 느낌이 오묘하군요. final_image_size를 바꾸면 그림 양상이 바뀝니다.


final_image_size를 키우면 스타일이 좀 더 섬세해지는 것 같습니다!
다른 스타일의 결과들도 봐볼까요?
아비뇽의 여인들 by 파블로 피카소

기억의 지속 by 살바도르 달리
펠릭스 페네옹의 초상 by 폴 시냐크

우는 여인 by 파블로 피카소

별이 빛나는 밤 by 빈센트 반 고흐

다음에는 직접 모델을 설계해서 Neural Style Transfer를 도전해봐야겠습니다!
참조: https://www.tensorflow.org/tutorials/generative/style_transfer?hl=ko
'인공지능 놀이터' 카테고리의 다른 글
| [TensorFlow] TensorFlowTTS를 사용한 한국어 음성 발화 (0) | 2022.11.28 |
|---|
